RBAC 및 JWT 검증으로 Rocket API 보호하기
이 가이드는 Logto에서 발급한 역할 기반 접근 제어 (RBAC) 및 JSON Web Token (JWT)을 사용하여 Rocket API에 인가 (Authorization)를 구현하고 보안을 강화하는 방법을 안내합니다.
시작하기 전에
클라이언트 애플리케이션은 Logto에서 액세스 토큰 (Access token)을 받아야 합니다. 아직 클라이언트 통합을 설정하지 않았다면, React, Vue, Angular 또는 기타 클라이언트 프레임워크를 위한 빠른 시작이나 서버 간 접근을 위한 기계 간 (M2M) 가이드를 확인하세요.
이 가이드는 Rocket 애플리케이션에서 이러한 토큰의 서버 측 검증에 중점을 둡니다.
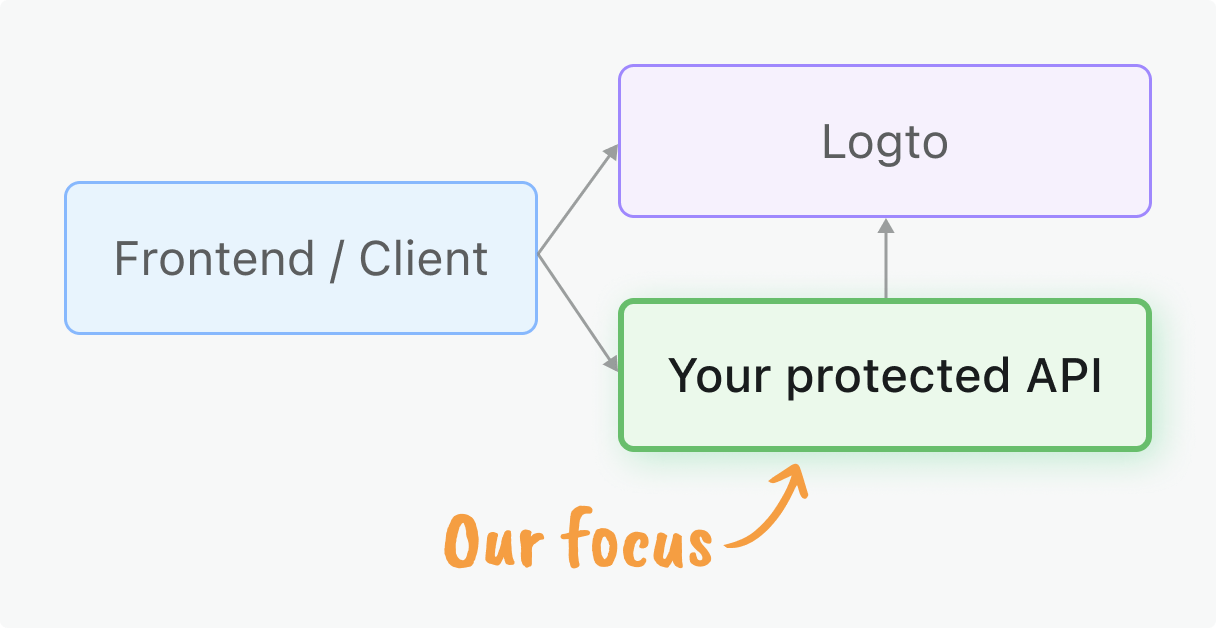
학습 내용
- JWT 검증: 액세스 토큰 (Access token)을 검증하고 인증 (Authentication) 정보를 추출하는 방법 학습
- 미들웨어 구현: API 보호를 위한 재사용 가능한 미들웨어 생성
- 권한 모델: 다양한 인가 (Authorization) 패턴 이해 및 구현:
- 애플리케이션 전체 엔드포인트를 위한 글로벌 API 리소스
- 테넌트별 기능 제어를 위한 조직 권한
- 다중 테넌트 데이터 접근을 위한 조직 수준 API 리소스
- RBAC 통합: API 엔드포인트에서 역할 기반 권한 (Role) 및 스코프 (Scope) 적용
사전 준비 사항
- 최신 안정 버전의 Rust 설치
- Rocket 및 웹 API 개발에 대한 기본 이해
- Logto 애플리케이션 구성 완료 (빠른 시작 참고)
권한 모델 개요
보호를 구현하기 전에, 애플리케이션 아키텍처에 맞는 권한 모델을 선택하세요. 이는 Logto의 세 가지 주요 인가 (Authorization) 시나리오와 일치합니다:
- 글로벌 API 리소스
- 조직 (비-API) 권한
- 조직 수준 API 리소스
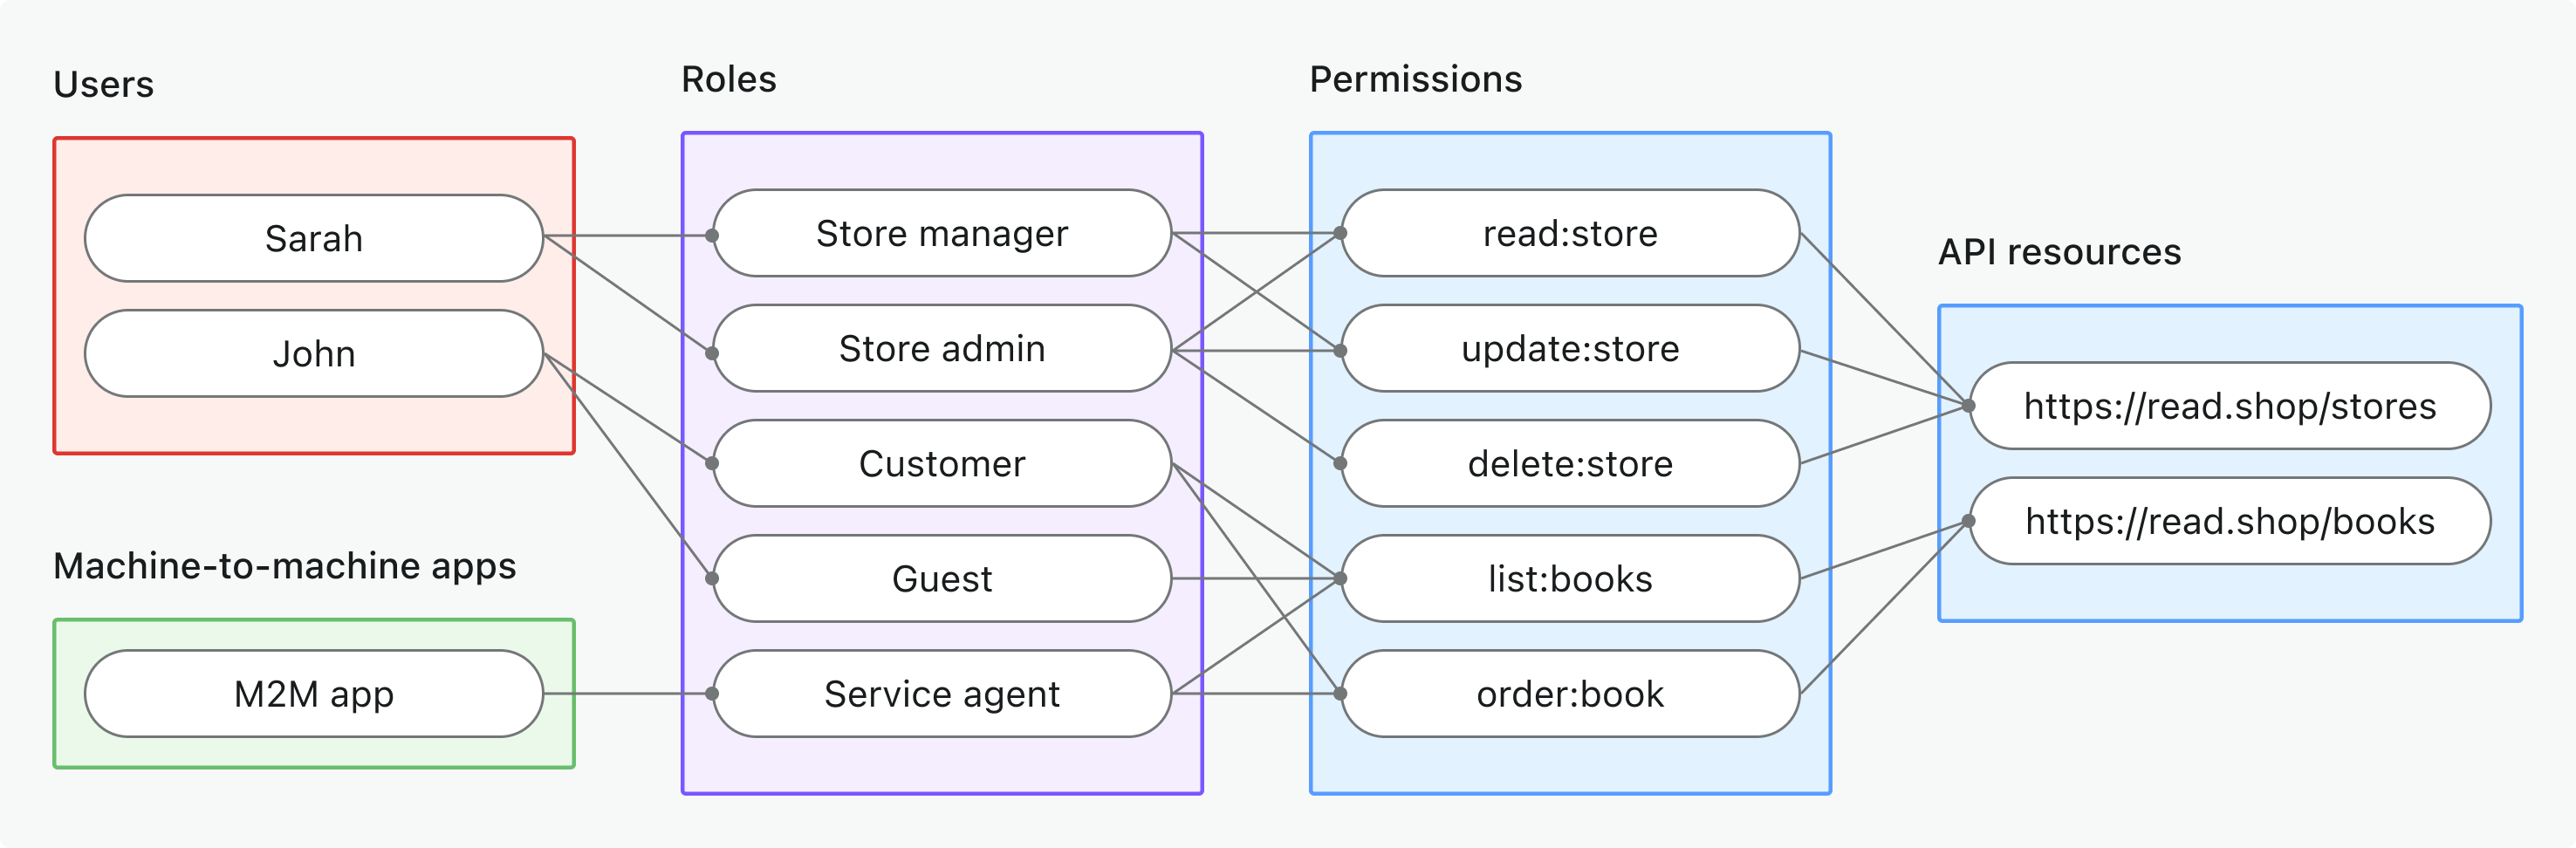
- 사용 사례: 애플리케이션 전체에서 공유되는 API 리소스를 보호 (조직별이 아님)
- 토큰 유형: 글로벌 대상이 포함된 액세스 토큰 (Access token)
- 예시: 공개 API, 핵심 제품 서비스, 관리자 엔드포인트
- 적합 대상: 모든 고객이 사용하는 API가 있는 SaaS 제품, 테넌트 분리가 없는 마이크로서비스
- 자세히 알아보기: 글로벌 API 리소스 보호하기
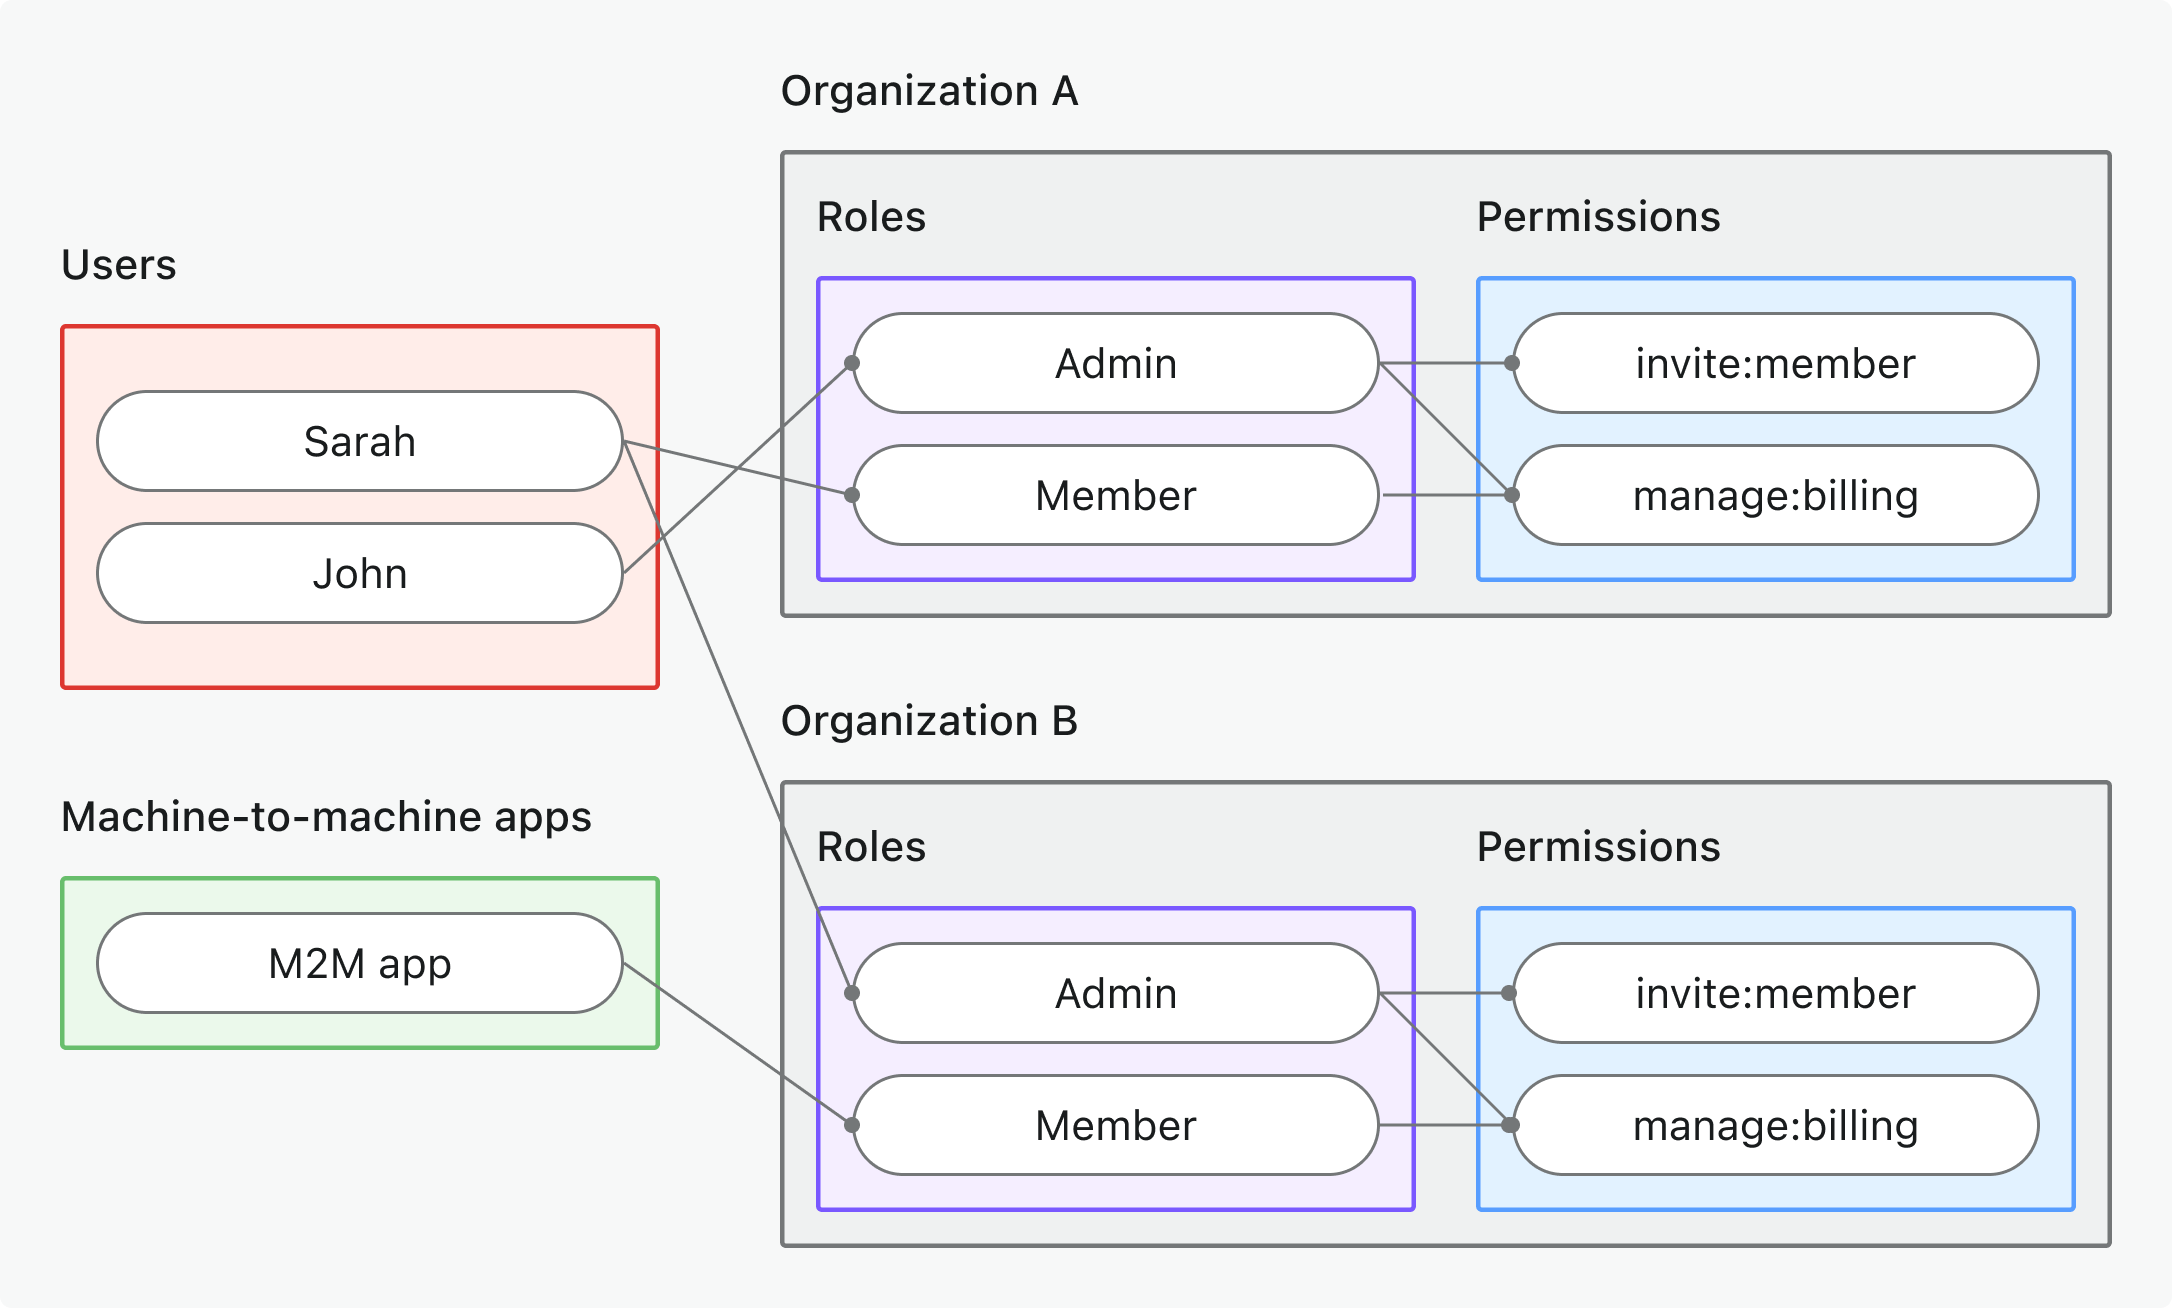
- 사용 사례: 조직별 동작, UI 기능 또는 비즈니스 로직 제어 (API 아님)
- 토큰 유형: 조직별 대상이 포함된 조직 토큰 (Organization token)
- 예시: 기능 게이팅, 대시보드 권한, 멤버 초대 제어
- 적합 대상: 조직별 기능과 워크플로우가 있는 다중 테넌트 SaaS
- 자세히 알아보기: 조직 (비-API) 권한 보호하기
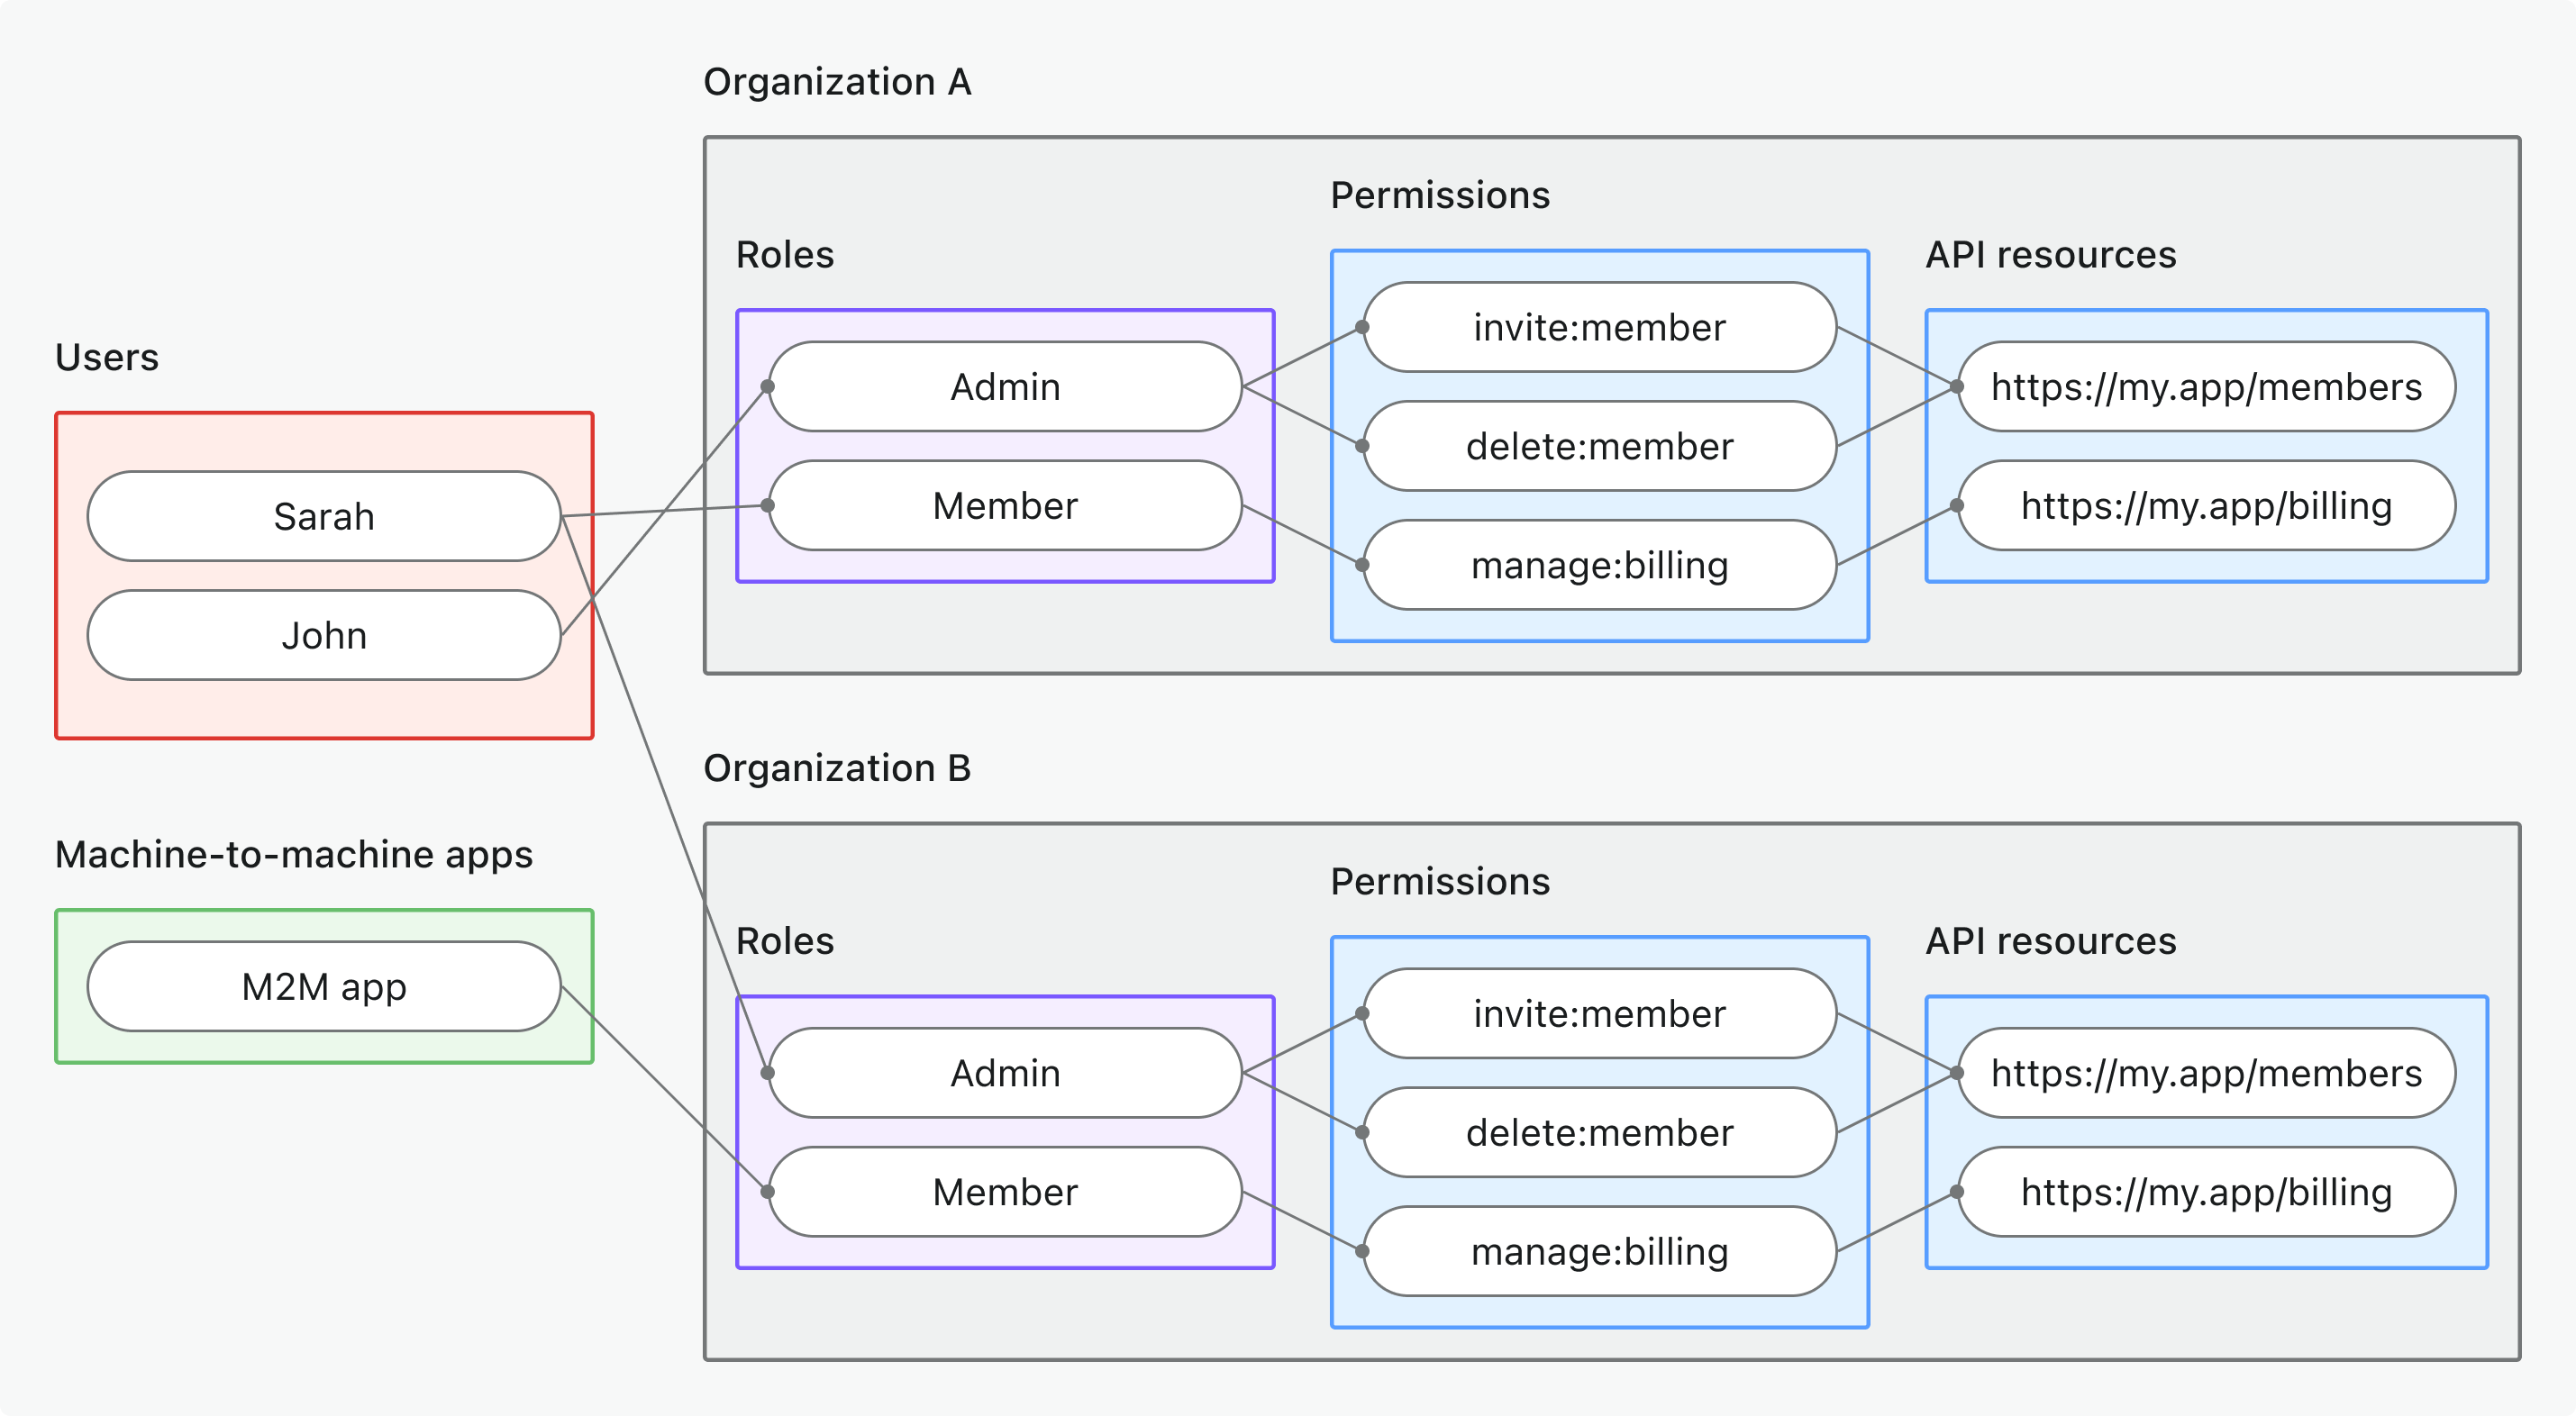
- 사용 사례: 특정 조직 컨텍스트 내에서 접근 가능한 API 리소스 보호
- 토큰 유형: API 리소스 대상 + 조직 컨텍스트가 포함된 조직 토큰 (Organization token)
- 예시: 다중 테넌트 API, 조직 범위 데이터 엔드포인트, 테넌트별 마이크로서비스
- 적합 대상: API 데이터가 조직 범위인 다중 테넌트 SaaS
- 자세히 알아보기: 조직 수준 API 리소스 보호하기
💡 진행하기 전에 모델을 선택하세요 - 이 가이드 전반에서 선택한 접근 방식을 참고하게 됩니다.
빠른 준비 단계
Logto 리소스 및 권한 구성
- 글로벌 API 리소스
- 조직(비-API) 권한
- 조직 수준 API 리소스
- API 리소스 생성: 콘솔 → API 리소스로 이동하여 API를 등록하세요 (예:
https://api.yourapp.com) - 권한 정의:
read:products,write:orders와 같은 스코프를 추가하세요 – 권한과 함께 API 리소스 정의하기 참고 - 글로벌 역할 생성: 콘솔 → 역할로 이동하여 API 권한이 포함된 역할을 생성하세요 – 글로벌 역할 구성 참고
- 역할 할당: API 접근이 필요한 사용자 또는 M2M 애플리케이션에 역할을 할당하세요
- 조직 권한 정의: 조직 템플릿에서
invite:member,manage:billing과 같은 비-API 조직 권한을 생성하세요 - 조직 역할 설정: 조직 템플릿에 조직별 역할을 구성하고, 해당 역할에 권한을 할당하세요
- 조직 역할 할당: 각 조직 컨텍스트 내에서 사용자에게 조직 역할을 할당하세요
- API 리소스 생성: 위와 같이 API 리소스를 등록하되, 조직 컨텍스트에서 사용될 것입니다
- 권한 정의: 조직 컨텍스트에 범위가 지정된
read:data,write:settings와 같은 스코프를 추가하세요 - 조직 템플릿 구성: API 리소스 권한이 포함된 조직 역할을 설정하세요
- 조직 역할 할당: API 권한이 포함된 조직 역할에 사용자 또는 M2M 애플리케이션을 할당하세요
- 멀티 테넌트 설정: API가 조직 범위의 데이터 및 검증을 처리할 수 있도록 하세요
역할 기반 접근 제어 가이드에서 단계별 설정 방법을 시작하세요.
클라이언트 애플리케이션 업데이트
클라이언트에서 적절한 스코프를 요청하세요:
- 사용자 인증: 앱 업데이트 →에서 API 스코프 및 / 또는 조직 컨텍스트를 요청하세요
- 기계 간: M2M 스코프 구성 →로 서버 간 접근을 설정하세요
이 과정에는 일반적으로 클라이언트 설정을 다음 중 하나 이상을 포함하도록 업데이트하는 것이 포함됩니다:
- OAuth 플로우의
scope파라미터 - API 리소스 접근을 위한
resource파라미터 - 조직 컨텍스트를 위한
organization_id
테스트 중인 사용자 또는 M2M 앱에 API에 필요한 권한이 포함된 적절한 역할 또는 조직 역할이 할당되어 있는지 확인하세요.
API 프로젝트 초기화하기
새로운 Rocket 프로젝트를 초기화하려면, 디렉터리를 생성하고 기본 구조를 설정하세요:
cargo new your-api-name
cd your-api-name
Cargo.toml에 Rocket 의존성을 추가하세요:
[dependencies]
rocket = { version = "0.5", features = ["json"] }
serde = { version = "1.0", features = ["derive"] }
serde_json = "1.0"
기본 Rocket 애플리케이션을 생성하세요:
use rocket::{get, launch, routes, serde::json::Json};
use serde_json::{json, Value};

#[get("/")]
fn hello_handler() -> Json<Value> {
    Json(json!({ "message": "Hello from Rocket" }))
}

#[launch]
fn rocket() -> _ {
    rocket::build()
        .mount("/", routes![hello_handler])
}
개발 서버를 시작하세요:
cargo run
라우트, 요청 가드 및 기타 기능 설정 방법에 대한 자세한 내용은 Rocket 문서를 참고하세요.
상수 및 유틸리티 초기화하기
코드에서 필요한 상수와 유틸리티를 정의하여 토큰 추출 및 유효성 검사를 처리하세요. 유효한 요청에는 Authorization 헤더가 반드시 Bearer <액세스 토큰 (Access token)> 형식으로 포함되어야 합니다.
use serde::{Deserialize, Serialize};
use std::fmt;

pub const JWKS_URI: &str = "https://your-tenant.logto.app/oidc/jwks";
pub const ISSUER: &str = "https://your-tenant.logto.app/oidc";

#[derive(Debug, Clone, Serialize, Deserialize)]
pub struct AuthInfo {
    pub sub: String,
    pub client_id: Option<String>,
    pub organization_id: Option<String>,
    pub scopes: Vec<String>,
    pub audience: Vec<String>,
}

impl AuthInfo {
    pub fn new(
        sub: String,
        client_id: Option<String>,
        organization_id: Option<String>,
        scopes: Vec<String>,
        audience: Vec<String>,
    ) -> Self {
        Self {
            sub,
            client_id,
            organization_id,
            scopes,
            audience,
        }
    }
}

#[derive(Debug)]
pub struct AuthorizationError {
    pub message: String,
    pub status_code: u16,
}

impl AuthorizationError {
    pub fn new(message: impl Into<String>) -> Self {
        Self {
            message: message.into(),
            status_code: 403,
        }
    }

    pub fn with_status(message: impl Into<String>, status_code: u16) -> Self {
        Self {
            message: message.into(),
            status_code,
        }
    }
}

impl fmt::Display for AuthorizationError {
    fn fmt(&self, f: &mut fmt::Formatter<'_>) -> fmt::Result {
        write!(f, "{}", self.message)
    }
}

impl std::error::Error for AuthorizationError {}

pub fn extract_bearer_token(authorization: Option<&str>) -> Result<&str, AuthorizationError> {
    let auth_header = authorization.ok_or_else(|| {
        AuthorizationError::with_status("Authorization header is missing", 401)
    })?;

    if !auth_header.starts_with("Bearer ") {
        return Err(AuthorizationError::with_status(
            "Authorization header must start with \"Bearer \"",
            401,
        ));
    }

    Ok(&auth_header[7..]) // 'Bearer ' 접두사를 제거합니다
}
Logto 테넌트 정보 가져오기
Logto에서 발급한 토큰을 검증하려면 다음 값들이 필요합니다:
- JSON Web Key Set (JWKS) URI: JWT 서명을 검증하는 데 사용되는 Logto의 공개 키 URL입니다.
- 발급자 (Issuer): 예상되는 발급자 값 (Logto의 OIDC URL).
먼저, Logto 테넌트의 엔드포인트를 찾아야 합니다. 다음 위치에서 확인할 수 있습니다:
- Logto 콘솔에서 설정 → 도메인에서 확인하세요.
- Logto에서 구성한 애플리케이션 설정의 설정 → 엔드포인트 & 자격 증명에서 확인하세요.
OpenID Connect 디스커버리 엔드포인트에서 가져오기
이 값들은 Logto의 OpenID Connect 디스커버리 엔드포인트에서 가져올 수 있습니다:
https://<your-logto-endpoint>/oidc/.well-known/openid-configuration
예시 응답입니다 (다른 필드는 생략):
{
  "jwks_uri": "https://your-tenant.logto.app/oidc/jwks",
  "issuer": "https://your-tenant.logto.app/oidc"
}
코드에 하드코딩하기 (권장하지 않음)
Logto는 JWKS URI 또는 발급자 (Issuer)를 커스터마이즈할 수 없으므로, 이 값들을 코드에 하드코딩할 수 있습니다. 하지만, 향후 설정이 변경될 경우 유지보수 부담이 커질 수 있으므로 프로덕션 애플리케이션에서는 권장하지 않습니다.
- JWKS URI:
https://<your-logto-endpoint>/oidc/jwks - 발급자 (Issuer):
https://<your-logto-endpoint>/oidc
토큰 및 권한 검증하기
토큰을 추출하고 OIDC 구성을 가져온 후, 다음을 검증하세요:
- 서명: JWT는 유효해야 하며 Logto(JWKS를 통해)에서 서명되어야 합니다.
- 발급자 (Issuer): Logto 테넌트의 발급자와 일치해야 합니다.
- 대상 (Audience): Logto에 등록된 API의 리소스 지표 또는 해당되는 경우 조직 컨텍스트와 일치해야 합니다.
- 만료: 토큰이 만료되지 않아야 합니다.
- 권한 (스코프, Permissions): 토큰에는 API/동작에 필요한 스코프가 포함되어야 합니다. 스코프는
scope클레임에 공백으로 구분된 문자열입니다. - 조직 컨텍스트: 조직 수준의 API 리소스를 보호하는 경우,
organization_id클레임을 검증하세요.
JWT 구조와 클레임에 대해 더 알아보려면 JSON Web Token 을 참고하세요.
각 권한 모델별로 확인해야 할 사항
클레임과 검증 규칙은 권한 모델에 따라 다릅니다:
- 글로벌 API 리소스
- 조직(비-API) 권한
- 조직 수준 API 리소스
- Audience 클레임 (
aud): API 리소스 지표 - Organization 클레임 (
organization_id): 없음 - 확인할 스코프(권한) (
scope): API 리소스 권한
- Audience 클레임 (
aud):urn:logto:organization:<id>(조직 컨텍스트가aud클레임에 있음) - Organization 클레임 (
organization_id): 없음 - 확인할 스코프(권한) (
scope): 조직 권한
- Audience 클레임 (
aud): API 리소스 지표 - Organization 클레임 (
organization_id): 조직 ID(요청과 일치해야 함) - 확인할 스코프(권한) (
scope): API 리소스 권한
비-API 조직 권한의 경우, 조직 컨텍스트는 aud 클레임(예: urn:logto:organization:abc123)으로
표현됩니다. organization_id 클레임은 조직 수준 API 리소스 토큰에만 존재합니다.
안전한 멀티 테넌트 API를 위해 항상 권한(스코프)과 컨텍스트(대상, 조직)를 모두 검증하세요.
검증 로직 추가하기
우리는 jsonwebtoken 을 사용하여 JWT 를 검증합니다. Cargo.toml에 필요한 의존성을 추가하세요:
[dependencies]
jsonwebtoken = "9.0"
serde = { version = "1.0", features = ["derive"] }
serde_json = "1.0"
reqwest = { version = "0.11", features = ["json"] }
tokio = { version = "1.0", features = ["full"] }
먼저, JWT 검증을 처리하기 위한 공통 유틸리티를 추가하세요:
use crate::{AuthInfo, AuthorizationError, ISSUER, JWKS_URI};
use jsonwebtoken::{decode, decode_header, Algorithm, DecodingKey, Validation};
use serde_json::Value;
use std::collections::HashMap;

pub struct JwtValidator {
    jwks: HashMap<String, DecodingKey>,
}

impl JwtValidator {
    pub async fn new() -> Result<Self, AuthorizationError> {
        let jwks = Self::fetch_jwks().await?;
        Ok(Self { jwks })
    }

    async fn fetch_jwks() -> Result<HashMap<String, DecodingKey>, AuthorizationError> {
        let response = reqwest::get(JWKS_URI).await.map_err(|e| {
            AuthorizationError::with_status(format!("Failed to fetch JWKS: {}", e), 401)
        })?;

        let jwks: Value = response.json().await.map_err(|e| {
            AuthorizationError::with_status(format!("Failed to parse JWKS: {}", e), 401)
        })?;

        let mut keys = HashMap::new();

        if let Some(keys_array) = jwks["keys"].as_array() {
            for key in keys_array {
                if let (Some(kid), Some(kty), Some(n), Some(e)) = (
                    key["kid"].as_str(),
                    key["kty"].as_str(),
                    key["n"].as_str(),
                    key["e"].as_str(),
                ) {
                    if kty == "RSA" {
                        if let Ok(decoding_key) = DecodingKey::from_rsa_components(n, e) {
                            keys.insert(kid.to_string(), decoding_key);
                        }
                    }
                }
            }
        }

        if keys.is_empty() {
            return Err(AuthorizationError::with_status("No valid keys found in JWKS", 401));
        }

        Ok(keys)
    }

    pub fn validate_jwt(&self, token: &str) -> Result<AuthInfo, AuthorizationError> {
        let header = decode_header(token).map_err(|e| {
            AuthorizationError::with_status(format!("Invalid token header: {}", e), 401)
        })?;

        let kid = header.kid.ok_or_else(|| {
            AuthorizationError::with_status("Token missing kid claim", 401)
        })?;

        let key = self.jwks.get(&kid).ok_or_else(|| {
            AuthorizationError::with_status("Unknown key ID", 401)
        })?;

        let mut validation = Validation::new(Algorithm::RS256);
        validation.set_issuer(&[ISSUER]);
        validation.validate_aud = false; // 대상 (Audience)는 수동으로 검증합니다.

        let token_data = decode::<Value>(token, key, &validation).map_err(|e| {
            AuthorizationError::with_status(format!("Invalid token: {}", e), 401)
        })?;

        let claims = token_data.claims;
        self.verify_payload(&claims)?;

        Ok(self.create_auth_info(claims))
    }

    fn verify_payload(&self, claims: &Value) -> Result<(), AuthorizationError> {
        // 권한 모델에 따라 검증 로직을 구현하세요.
        // 아래 권한 모델 섹션에서 예시를 확인할 수 있습니다.
        Ok(())
    }

    fn create_auth_info(&self, claims: Value) -> AuthInfo {
        let scopes = claims["scope"]
            .as_str()
            .map(|s| s.split(' ').map(|s| s.to_string()).collect())
            .unwrap_or_default();

        let audience = match &claims["aud"] {
            Value::Array(arr) => arr.iter().filter_map(|v| v.as_str().map(|s| s.to_string())).collect(),
            Value::String(s) => vec![s.clone()],
            _ => vec![],
        };

        AuthInfo::new(
            claims["sub"].as_str().unwrap_or_default().to_string(),
            claims["client_id"].as_str().map(|s| s.to_string()),
            claims["organization_id"].as_str().map(|s| s.to_string()),
            scopes,
            audience,
        )
    }
}
그 다음, 액세스 토큰을 검증하는 미들웨어를 구현하세요:
use crate::{AuthInfo, AuthorizationError, extract_bearer_token};
use crate::jwt_validator::JwtValidator;
use rocket::{
    http::Status,
    outcome::Outcome,
    request::{self, FromRequest, Request},
    State,
};

#[rocket::async_trait]
impl<'r> FromRequest<'r> for AuthInfo {
    type Error = AuthorizationError;

    async fn from_request(req: &'r Request<'_>) -> request::Outcome<Self, Self::Error> {
        let validator = match req.guard::<&State<JwtValidator>>().await {
            Outcome::Success(validator) => validator,
            Outcome::Failure((status, _)) => {
                return Outcome::Failure((
                    status,
                    AuthorizationError::with_status("JWT validator not found", 500),
                ))
            }
            Outcome::Forward(()) => {
                return Outcome::Forward(())
            }
        };

        let authorization = req.headers().get_one("authorization");

        match extract_bearer_token(authorization)
            .and_then(|token| validator.validate_jwt(token))
        {
            Ok(auth_info) => Outcome::Success(auth_info),
            Err(e) => {
                let status = Status::from_code(e.status_code).unwrap_or(Status::Forbidden);
                Outcome::Failure((status, e))
            }
        }
    }
}
권한 모델에 따라 JwtValidator에서 적절한 검증 로직을 구현하세요:
- 글로벌 API 리소스
- 조직 (비-API) 권한
- 조직 레벨 API 리소스
fn verify_payload(&self, claims: &Value) -> Result<(), AuthorizationError> {
    // 대상 (audience) 클레임이 API 리소스 지표와 일치하는지 확인
    let audiences = match &claims["aud"] {
        Value::Array(arr) => arr.iter().filter_map(|v| v.as_str()).collect::<Vec<_>>(),
        Value::String(s) => vec![s.as_str()],
        _ => vec![],
    };

    if !audiences.contains(&"https://your-api-resource-indicator") {
        return Err(AuthorizationError::new("Invalid audience"));
    }

    // 글로벌 API 리소스에 필요한 스코프 확인
    let required_scopes = vec!["api:read", "api:write"]; // 실제 필요한 스코프로 교체하세요.
    let scopes = claims["scope"]
        .as_str()
        .map(|s| s.split(' ').collect::<Vec<_>>())
        .unwrap_or_default();

    for required_scope in &required_scopes {
        if !scopes.contains(required_scope) {
            return Err(AuthorizationError::new("Insufficient scope"));
        }
    }

    Ok(())
}
fn verify_payload(&self, claims: &Value) -> Result<(), AuthorizationError> {
    // 대상 (audience) 클레임이 조직 형식과 일치하는지 확인
    let audiences = match &claims["aud"] {
        Value::Array(arr) => arr.iter().filter_map(|v| v.as_str()).collect::<Vec<_>>(),
        Value::String(s) => vec![s.as_str()],
        _ => vec![],
    };

    let has_org_audience = audiences.iter().any(|aud| aud.starts_with("urn:logto:organization:"));
    if !has_org_audience {
        return Err(AuthorizationError::new("Invalid audience for organization permissions"));
    }

    // 조직 ID가 컨텍스트와 일치하는지 확인 (요청 컨텍스트에서 추출 필요)
    let expected_org_id = "your-organization-id"; // 요청 컨텍스트에서 추출
    let expected_aud = format!("urn:logto:organization:{}", expected_org_id);
    if !audiences.contains(&expected_aud.as_str()) {
        return Err(AuthorizationError::new("Organization ID mismatch"));
    }

    // 조직 권한에 필요한 스코프 확인
    let required_scopes = vec!["invite:users", "manage:settings"]; // 실제 필요한 스코프로 교체하세요.
    let scopes = claims["scope"]
        .as_str()
        .map(|s| s.split(' ').collect::<Vec<_>>())
        .unwrap_or_default();

    for required_scope in &required_scopes {
        if !scopes.contains(required_scope) {
            return Err(AuthorizationError::new("Insufficient organization scope"));
        }
    }

    Ok(())
}
fn verify_payload(&self, claims: &Value) -> Result<(), AuthorizationError> {
    // 대상 (audience) 클레임이 API 리소스 지표와 일치하는지 확인
    let audiences = match &claims["aud"] {
        Value::Array(arr) => arr.iter().filter_map(|v| v.as_str()).collect::<Vec<_>>(),
        Value::String(s) => vec![s.as_str()],
        _ => vec![],
    };

    if !audiences.contains(&"https://your-api-resource-indicator") {
        return Err(AuthorizationError::new("Invalid audience for organization-level API resources"));
    }

    // 조직 ID가 컨텍스트와 일치하는지 확인 (요청 컨텍스트에서 추출 필요)
    let expected_org_id = "your-organization-id"; // 요청 컨텍스트에서 추출
    let org_id = claims["organization_id"].as_str().unwrap_or_default();
    if expected_org_id != org_id {
        return Err(AuthorizationError::new("Organization ID mismatch"));
    }

    // 조직 레벨 API 리소스에 필요한 스코프 확인
    let required_scopes = vec!["api:read", "api:write"]; // 실제 필요한 스코프로 교체하세요.
    let scopes = claims["scope"]
        .as_str()
        .map(|s| s.split(' ').collect::<Vec<_>>())
        .unwrap_or_default();

    for required_scope in &required_scopes {
        if !scopes.contains(required_scope) {
            return Err(AuthorizationError::new("Insufficient organization-level API scopes"));
        }
    }

    Ok(())
}
미들웨어를 API에 적용하기
이제, 보호된 API 라우트에 미들웨어를 적용하세요.
use rocket::{get, launch, routes, serde::json::Json};
use serde_json::{json, Value};

mod lib;
mod jwt_validator;
mod guards;

use lib::AuthInfo;
use jwt_validator::JwtValidator;

#[get("/api/protected")]
fn protected_handler(auth: AuthInfo) -> Json<Value> {
    // 요청 가드에서 인증 (Authentication) 정보를 직접 접근합니다
    Json(json!({ "auth": auth }))
}

#[launch]
async fn rocket() -> _ {
    let validator = JwtValidator::new().await.expect("JWT 검증기 초기화에 실패했습니다");

    rocket::build()
        .manage(validator)
        .mount("/", routes![protected_handler])
}
보호된 API 테스트하기
액세스 토큰 (Access token) 받기
클라이언트 애플리케이션에서: 클라이언트 통합을 설정했다면, 앱이 토큰을 자동으로 획득할 수 있습니다. 액세스 토큰 (Access token)을 추출하여 API 요청에 사용하세요.
curl / Postman으로 테스트할 때:
-
사용자 토큰: 클라이언트 앱의 개발자 도구에서 localStorage 또는 네트워크 탭에서 액세스 토큰 (Access token)을 복사하세요.
-
기계 간 (Machine-to-machine) 토큰: 클라이언트 자격 증명 플로우를 사용하세요. 다음은 curl을 사용한 비공식 예시입니다:
curl -X POST https://your-tenant.logto.app/oidc/token \
  -H "Content-Type: application/x-www-form-urlencoded" \
  -d "grant_type=client_credentials" \
  -d "client_id=your-m2m-client-id" \
  -d "client_secret=your-m2m-client-secret" \
  -d "resource=https://your-api-resource-indicator" \
  -d "scope=api:read api:write"
API 리소스 (API resource)와 권한 (Permission)에 따라
resource및scope파라미터를 조정해야 할 수 있습니다. API가 조직 범위라면organization_id파라미터도 필요할 수 있습니다.
토큰 내용을 확인해야 하나요? 우리의 JWT 디코더를 사용하여 JWT를 디코드하고 검증하세요.
보호된 엔드포인트 테스트하기
유효한 토큰 요청
curl -H "Authorization: Bearer eyJhbGciOiJSUzI1NiIsInR5cCI6IkpXVCJ9..." \
  http://localhost:3000/api/protected
예상 응답:
{
  "auth": {
    "sub": "user123",
    "clientId": "app456",
    "organizationId": "org789",
    "scopes": ["api:read", "api:write"],
    "audience": ["https://your-api-resource-indicator"]
  }
}
토큰 없음
curl http://localhost:3000/api/protected
예상 응답 (401):
{
  "error": "Authorization header is missing"
}
잘못된 토큰
curl -H "Authorization: Bearer invalid-token" \
  http://localhost:3000/api/protected
예상 응답 (401):
{
  "error": "Invalid token"
}
권한 (Permission) 모델별 테스트
- 글로벌 API 리소스
- 조직 (비-API) 권한
- 조직 수준 API 리소스
글로벌 스코프로 보호된 API 테스트 시나리오:
- 유효한 스코프: 필요한 API 스코프(예:
api:read,api:write)가 포함된 토큰으로 테스트하세요. - 스코프 누락: 토큰에 필요한 스코프가 없으면 403 Forbidden을 예상하세요.
- 잘못된 대상 (Audience): 대상이 API 리소스와 일치하지 않으면 403 Forbidden을 예상하세요.
# 스코프가 누락된 토큰 - 403 예상
curl -H "Authorization: Bearer token-without-required-scopes" \
  http://localhost:3000/api/protected
조직별 접근 제어 테스트 시나리오:
- 유효한 조직 토큰: 올바른 조직 컨텍스트(조직 ID 및 스코프)가 포함된 토큰으로 테스트하세요.
- 스코프 누락: 사용자가 요청한 작업에 대한 권한이 없으면 403 Forbidden을 예상하세요.
- 잘못된 조직: 대상이 조직 컨텍스트(
urn:logto:organization:<organization_id>)와 일치하지 않으면 403 Forbidden을 예상하세요.
# 잘못된 조직의 토큰 - 403 예상
curl -H "Authorization: Bearer token-for-different-organization" \
  http://localhost:3000/api/protected
API 리소스 검증과 조직 컨텍스트를 결합한 테스트 시나리오:
- 유효한 조직 + API 스코프: 조직 컨텍스트와 필요한 API 스코프가 모두 포함된 토큰으로 테스트하세요.
- API 스코프 누락: 조직 토큰에 필요한 API 권한이 없으면 403 Forbidden을 예상하세요.
- 잘못된 조직: 다른 조직의 토큰으로 API에 접근하면 403 Forbidden을 예상하세요.
- 잘못된 대상 (Audience): 대상이 조직 수준 API 리소스와 일치하지 않으면 403 Forbidden을 예상하세요.
# API 스코프가 없는 조직 토큰 - 403 예상
curl -H "Authorization: Bearer organization-token-without-api-scopes" \
  http://localhost:3000/api/protected
추가 자료
실전 RBAC: 애플리케이션을 위한 안전한 인가 (Authorization) 구현하기
멀티 테넌트 SaaS 애플리케이션 구축: 설계부터 구현까지 완벽 가이드